
How to Choose Birding Binoculars: What Really Matters in the Field
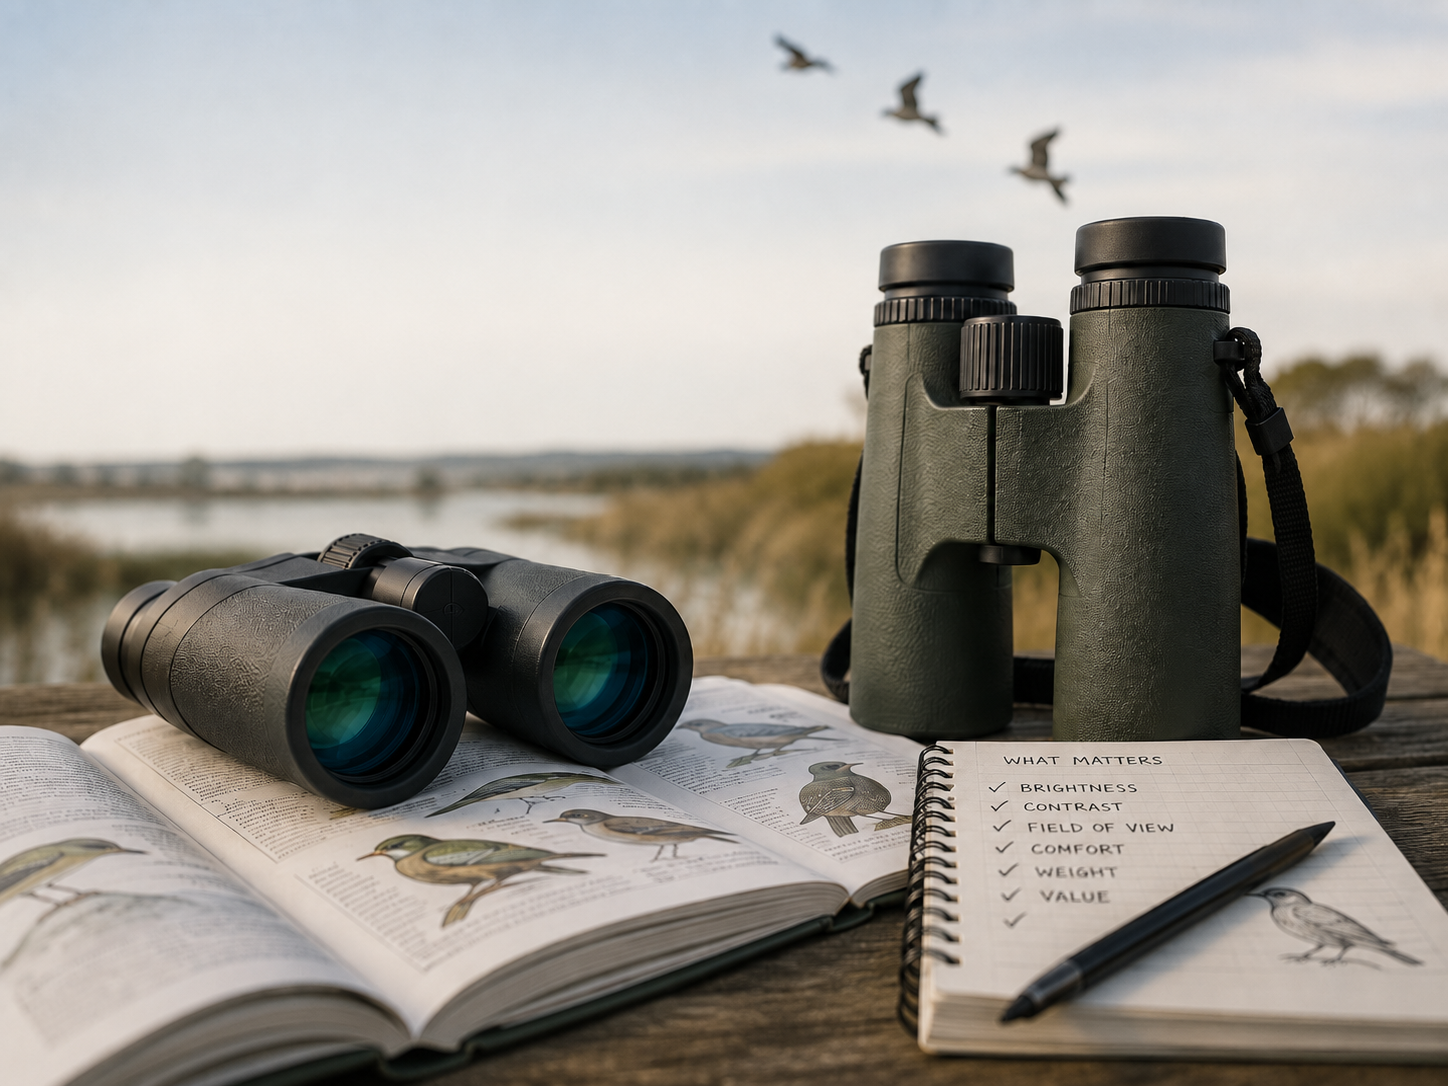
How magnification, objective size, image quality, fit, and weight affect your view, and how to determine if new binoculars will enhance your birding experience.
Choosing new binoculars is more complex than you might think.
Many binoculars look impressive under bright shop lights. But specifications alone do not show how they will perform when you are tracking a warbler through branches, watching distant birds in wind or carrying them all day.
There is no universal “best binocular” for everyone and every occasion.
Every binocular comes with trade-offs. Higher magnification makes the image bigger, but also makes hand shake more noticeable. Bigger lenses let in more light in dim conditions, but they’re heavier and bulkier. Compact binoculars are easier to carry, but you might need to be more careful about how you hold them.
So, the best binoculars are the ones where the trade-offs don’t get in the way of how you usually birdwatch.
The practical answer
Begin with three questions:
Where are your present binoculars lacking?
Are the new binoculars to replace them, or will they be used for a different job?
Can you see a significant improvement when both are compared directly?
It makes sense to replace your binoculars if a new pair clearly works better for the same job. Or, you might add a second pair for a different use—like a compact set for travel, a lighter pair for long walks, or a 10× model for spotting distant birds in open spaces.
Compare your present binoculars
Your current binoculars are the best starting point when you’re thinking about buying a new pair.
If possible, bring your binoculars to the store and compare them side by side with new models—look at the same things, in the same light, and at the same time. A new pair should make a real difference in your birding, not just look nice.
Four most common formats
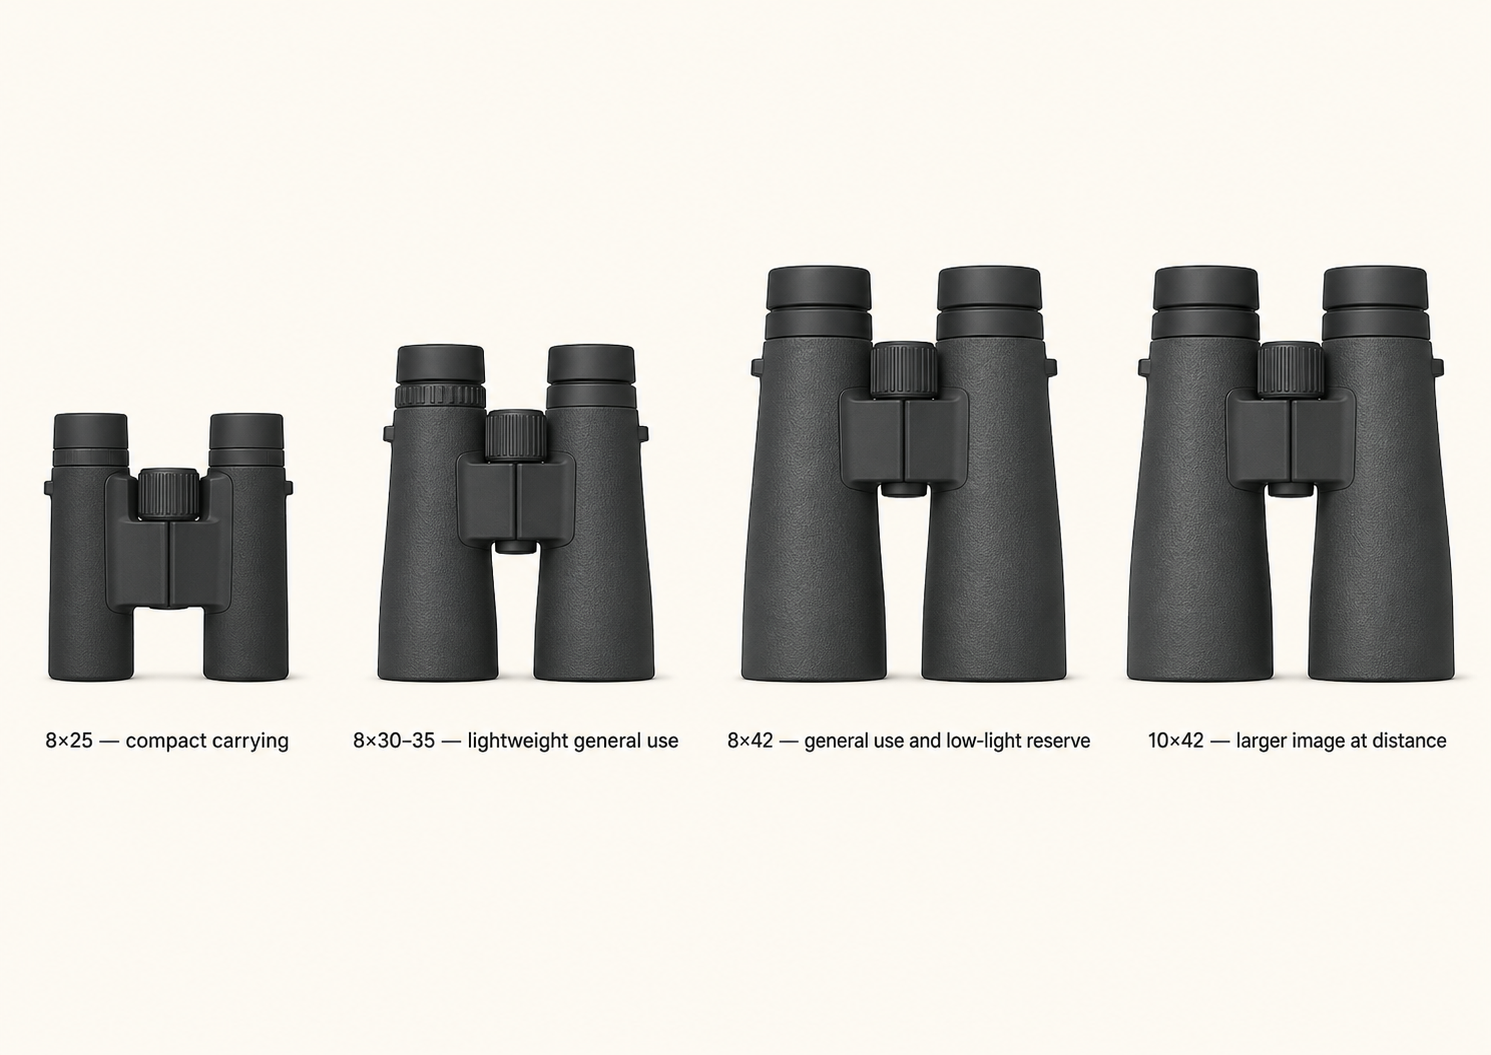
Common formats for birding binoculars
8×25
Travel, long walks and compact carrying; low weight and small packed size; smaller exit pupil; eye placement and spectacle fit may be more demanding
8×30–35
Lightweight general birding. Good balance of field, aperture and carrying comfort. Less low-light reserve than many 8×42 models
8×42
General use across varied habitats; generous exit pupil and often relaxed viewing; more bulk and weight
10×42
Open country, coasts and distant birds. Larger image and potentially more distant detail. More visible hand movement; corresponding models often have a narrower field
Many birders find 8×30 or 8×35 a useful compromise between field of view, exit pupil, weight and carrying comfort.
There is no default format for everyone. An 8×42 offers more low-light reserve when the observer’s pupil can use it. A 10×42 gives a larger image of distant birds but makes movement more visible. An 8×25 can be a useful second pair when low weight matters most.
The design of the individual model can matter more than its nominal format. A well-designed 8×32 may offer better glare control, colour correction, field of view or handling than a similarly priced 8×42, although it cannot match the larger instrument’s potential aperture and exit pupil.
Start by thinking about how and where you usually go birding
Different habitats place different demands on binoculars. In woodland and scrub, birds often appear suddenly and move through cover. A wide field, easy eye placement and responsive focusing may matter more than extra magnification.
On coasts, estuaries and reservoirs, birds are often distant. More magnification can help, although wind, heat shimmer and natural hand movement may reduce the advantage. Reedbeds and shaded wetlands test contrast. Good glare control may reveal more than a small increase in transmission, especially around reflective water.
For birds in flight, quick target acquisition, balance and a forgiving view are often more useful than marginal gains in stationary sharpness.
How far you walk matters too. Lighter binoculars don’t always have better optics, but you might use them more often because they’re easier to carry. Pick binoculars for your usual trips, not just for rare or extreme situations.
Magnification: a larger bird and a larger wobble
Magnification tells us how much larger the bird appears than it does to the unaided eye.
A 10× binocular presents the bird at 25 per cent greater scale than an 8× binocular. A distant bill shape, eye stripe or primary projection may therefore be easier to see.
But that doesn’t mean a 10× binocular always shows you 25 per cent more useful detail.
Everyone has some natural hand movement, even people who consider themselves steady. Breathing, muscle tension, pulse and balance all produce small movements. Wind, fatigue and an awkward stance add more.
Binoculars magnify that movement along with the bird. If an 8× and a 10× binocular move by the same small amount, the wobble appears 25 per cent greater through the 10×. On a calm day, if your hands are steady, you might see more detail with 10×. But in windy conditions, from an awkward spot, or after holding the binoculars for a while, that extra detail can be lost because of movement.
Ten-power models within the same range also often have narrower fields than their 8× equivalents, although this is not a fixed rule. A wide field of view helps when you’re trying to spot a warbler in the branches or follow a raptor that changes direction. A bigger image isn’t much help if you can’t find the bird in the first place.
Atmospheric conditions set another limit. Heat shimmer above mud, water or dry ground is part of the view. Greater magnification enlarges both the disturbance and the bird. Eight-power binoculars typically provide a steadier, wider view, while ten-power models offer a larger image. The most useful option depends on the observer, the binocular, weather conditions, and the target.
Objective diameter: potential capacity
The objective lenses are the large lenses at the front. In an 8×42, they are nominally 42 mm across. A larger effective objective can collect more light. In ideal optics, it can also resolve finer detail. But a bigger binocular doesn’t always look brighter or sharper.
Real binoculars are affected by optical design, coatings, alignment, glare, focus accuracy and movement. The observer’s eyesight and pupil size matter too. A larger objective also makes a larger exit pupil possible at the same magnification. This becomes useful when the light falls, and the observer’s own pupil opens enough to accept the wider beam.
The trade-off is typically increased size and weight.
Think of objective diameter as the binocular’s potential, not as a guarantee of image quality.
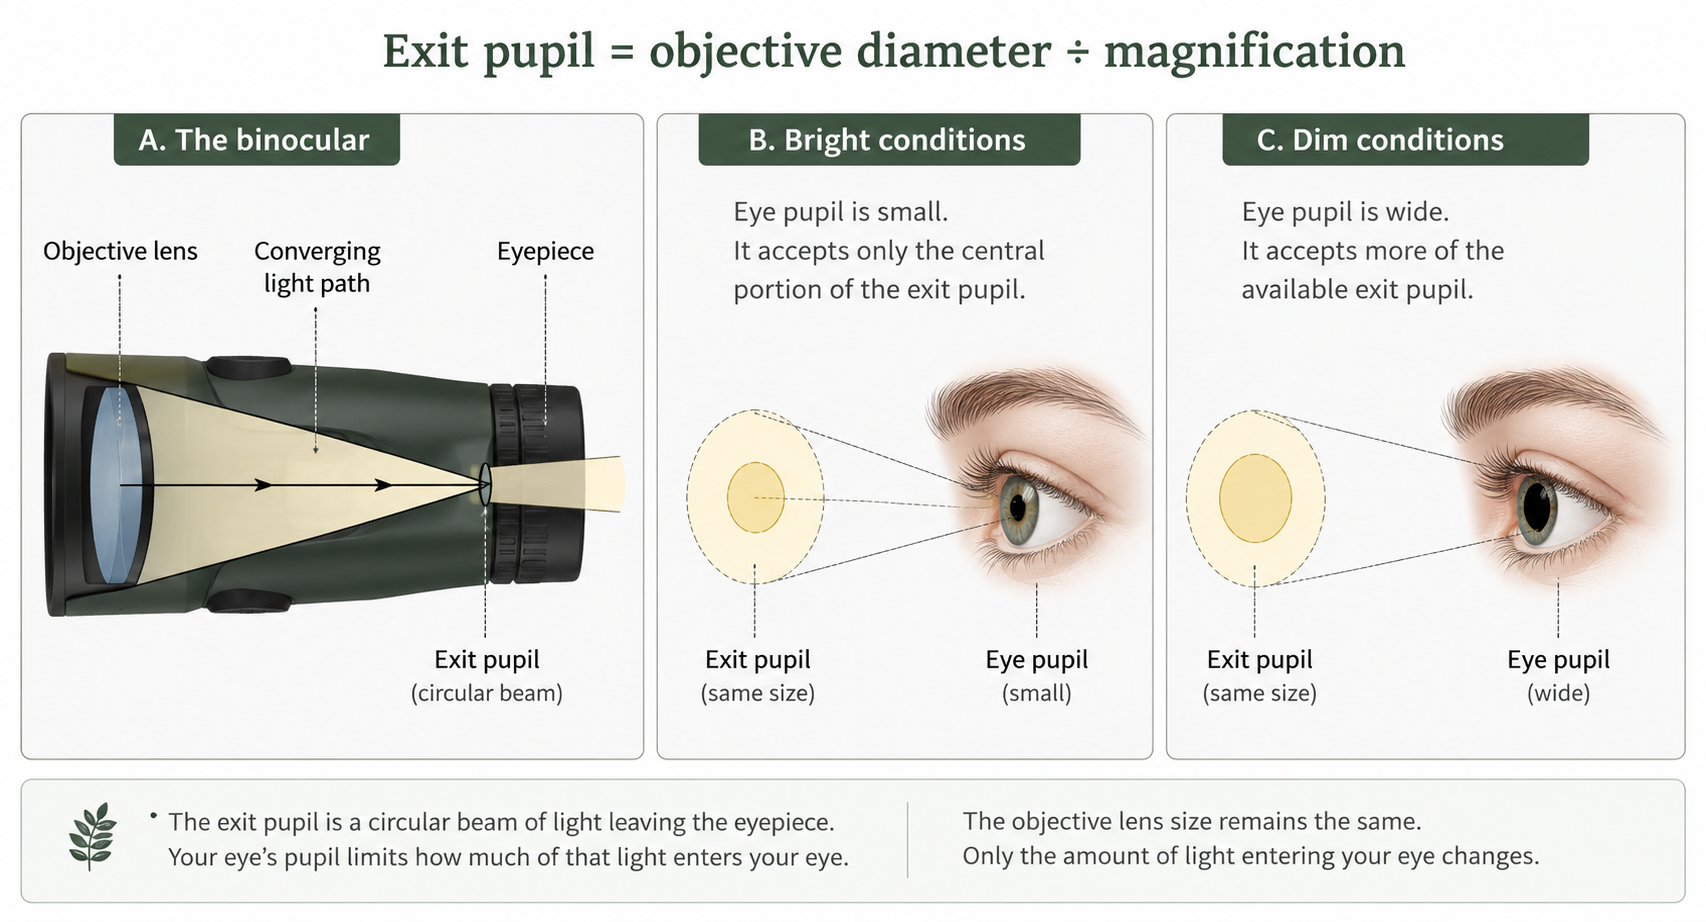
Exit pupil is equal to the diameter of the light beam leaving the eyepiece.
It is estimated by dividing the objective diameter by the magnification.
Exit pupil: the beam leaving the binocular
Exit pupil is equal to the diameter of the light beam leaving the eyepiece.
It is estimated by dividing the objective diameter by the magnification.
A larger exit pupil offers a wider beam to the eye. Whether the eye can use all of it depends on the size of the observer’s own pupil.
That’s why exit pupil size isn’t a simple way to judge brightness.
In bright conditions, the eye’s pupil may be smaller than the binocular’s exit pupil. It then accepts only the central part of the beam.
For example, an 8×42 has a 5.25 mm exit pupil. If the observer’s pupil is 3 mm, the eye accepts a beam corresponding to roughly 24 mm of on-axis aperture in an ideal system.
The binocular does not become an 8×24; its eyepiece design, field of view, glare control, and ease of eye placement remain unchanged.
A bigger exit pupil can make it easier to place your eyes, so small movements won’t darken the view as much.
Your pupils and changing light
Your pupils do not remain at one fixed size. They change with the brightness and extent of the scene. They also vary with age and individual physiology.
Older adults tend, on average, to have smaller pupils in dim light than younger adults. The variation between individuals is too large for age alone to predict one person’s pupil size. It’s also not accurate to say your pupils are always a certain size at sunset or a set time after. A shaded woodland is not the same as an open coast beneath a clear sky. Dark vegetation, reflective water and nearby lighting can produce different states of adaptation at the same time.
As light falls, your vision changes gradually. Cones dominate in daylight. In the broad middle range often called mesopic vision, rods and cones both contribute. Rods dominate only at very low light levels. This change happens slowly, not all at once. You’ve probably noticed that when you walk from a bright area into a dark room, your eyes need time to adjust. A larger exit pupil only becomes useful as the observer’s own pupil opens. Exactly when that happens varies with the person and the conditions.
A brighter image doesn’t always mean you’ll see more detail
Transmission describes how much intended light passes through the binocular.
A high-transmission binocular can produce a more vivid image than an otherwise identical model with lower transmission. The key factor is that all other variables remain the same.
Transmission is only part of the result. Unwanted light can reflect inside the binocular and spread across the image. This produces glare and reduces contrast.
A dark wader against reflective water is a good example. One binocular may produce a bright image, yet the plumage can be harder to examine if glare washes out the contrast.
Another binocular with slightly lower transmission but better glare control may show the bird more clearly.
Your eyes don’t turn extra light into more detail in a straightforward way.
Identification also depends on:
the size of the feature;
its contrast against the background;
glare;
image movement;
the observer’s adaptation;
the quality of the optical design;
the observer’s eyesight.
A bird in the shade might look brighter with binoculars that have a bigger exit pupil, but you won’t always see more feather detail. Still, a little extra light can help when you’re trying to spot a feature that’s just barely visible.
For this reason, metrics like “relative brightness” and “twilight factor” cannot reliably rank binoculars, as they overlook many variables related to the instrument, observer, and bird.
What makes an image look sharp?
Sharpness isn’t just one thing.
Resolution refers to the ability to distinguish fine detail. Birding, however, depends on more than the finest line visible on a test chart.
Bill shape, eye stripes, feather boundaries and differences in plumage tone all rely heavily on contrast.
Two binoculars may resolve a similar fine pattern while presenting an ordinary bird differently. One may preserve medium-sized detail more strongly, making the bird appear crisper.
Glare, colour errors, poor focus, edge aberrations, misalignment, and hand movement can all reduce perceived sharpness.
A bright image doesn’t always mean you’ll see more detail. Too much glare can make things look bright but washed out.
Chromatic aberration and ED glass
Glass bends different colours of light by slightly different amounts.
If the optical system does not correct this sufficiently, the colours do not form the same image. This is chromatic aberration.
It is often easiest to see around high-contrast edges:
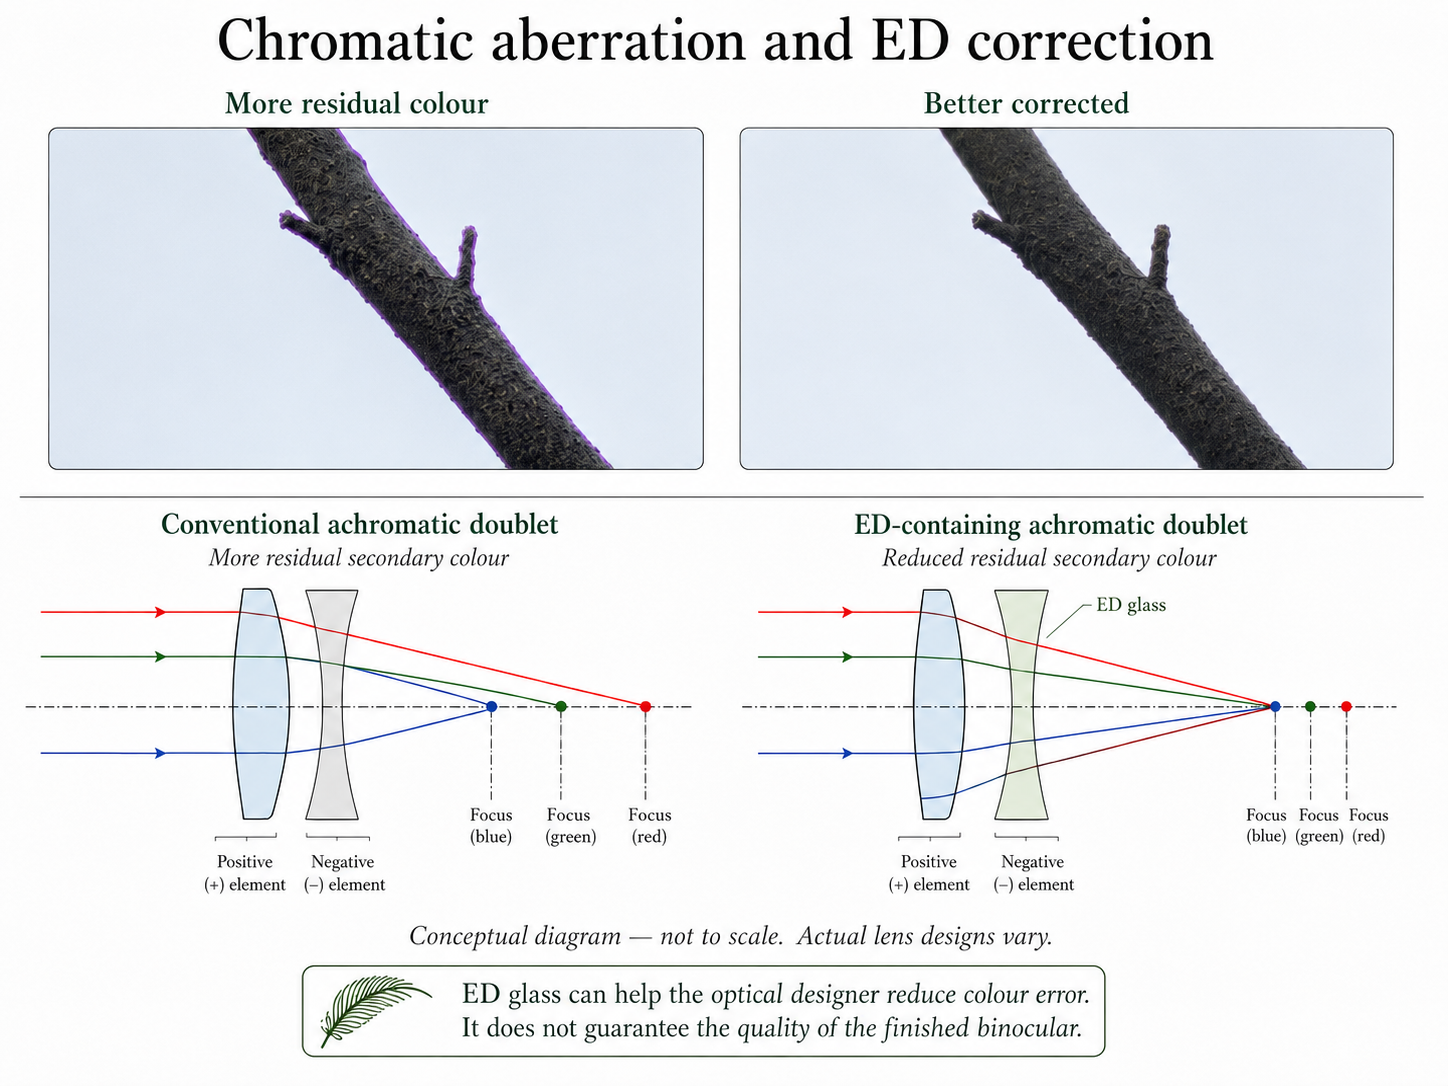
ED glass correction
a dark branch against a pale sky;
a gull against dark water;
a raptor above a bright horizon;
pale reeds against deep shadow.
It may appear as purple, green, yellow or red fringing. Even when the colour is not obvious, poor correction can soften the edge and reduce contrast.
ED means extra-low dispersion. Suitable ED glass gives the designer more control over colour correction.
When used properly, ED glass can cut down on false colours and help keep high-contrast details looking sharp.
It does not add aperture.
An ED 32 mm binocular does not gain the light-gathering capacity of a 42 mm objective. The label does not guarantee a wide field, strong glare control, high transmission, accurate alignment or smooth focusing.
A smaller, better-corrected binocular may sometimes show a dark branch against bright sky more cleanly than a larger model affected by stronger colour fringing or glare.
That does not mean the smaller binocular has greater physical capacity. It means the overall design performs better in that particular comparison.
Where two instruments are equally well designed, the larger ED binocular retains the broader advantages of the larger aperture. It can offer a larger exit pupil and more low-light capacity when the observer’s eye can use it. ED glass helps, but it doesn’t guarantee overall quality.
The term “HD” has no consistent industry definition. Depending on the manufacturer, it may refer to glass, coatings or simply a product range. Check what the manufacturer actually specifies and judge the binocular by its performance.
Field of view and the useful edge
Field of view describes how much of the scene is visible through the binocular.
A broad field can make it easier to locate a bird, track its movements, and understand where it fits within the habitat.
The widest field of view isn’t always the best choice. Image quality often declines away from the centre. This can happen for several reasons.
Field curvature means that the surface of best focus is curved rather than flat. Edge detail may return partly if the binocular or the observer’s eye refocuses.
Astigmatism affects detail differently in different directions. A single focus adjustment may not restore both.
Lateral colour can add fringing near the edge. Distortion can alter how the image feels while panning. Vignetting can reduce illumination or visible field.
The term “sharp to the edge” is incomplete unless the evaluation specifies what was tested and whether refocusing restored detail.
A wide field with gradual softening may be more effective for tracking birds than a narrower field with better edge correction.
What matters most is how much of the view you can actually use to find, follow, and watch birds comfortably.
Roof prisms, Porro prisms and image stabilisation
Porro- and roof-prism binoculars both turn the image the right way up, but fold the light path differently.
Porro models have the familiar offset barrels. They avoid the phase shift produced by a roof edge and can offer strong optical performance at moderate prices. Their shape is wider, while alignment, coatings, sealing and build quality still vary between models.
Roof-prism binoculars usually have straight barrels and a slimmer body. The roof edge creates a phase difference that can reduce contrast unless corrected by phase-correction coatings. Those coatings address one specific optical problem; they do not guarantee strong performance elsewhere.
Image stabilisation reduces the apparent effect of natural hand movement. This can make more of the available optical detail usable, particularly at higher magnifications. It does not correct false colour, glare, poor eye relief or a narrow field.
A stabilised view of a perched bird may be impressive. For birds in flight, usefulness also depends on how naturally the system responds while panning. Stabilised models vary in weight, battery requirements, weather protection and the amount and type of movement they can correct.
Eye relief, eyecups and fit
Great optics only matter if you can see the whole view comfortably.
Eye relief is the distance behind the eyepiece over which you can see the full field. It is especially important for spectacle wearers.
Published eye relief figures are a helpful initial guide but do not guarantee actual performance.
Manufacturers may measure eye relief differently, while the eye lenses can be recessed by different amounts. Eyecups also vary in shape and height.
Facial shape matters too. Eye-socket depth, nose width and cheekbones affect how the binocular sits.
A model that works well for one spectacle wearer may cut off the field for another.
Interpupillary distance is the distance between the centres of your pupils. The binocular hinge must close or open far enough to align both barrels with the observer’s eyes.
The result should be one comfortable circular field.
You can’t judge fit just by looking at the specs
Eye relief, interpupillary range, and weight can help narrow your options, but they do not determine whether a binocular fits your face and hands.
Try out the exact model before you buy it. Use your normal spectacles and outdoor clothing. Adjust the eyecups, hinge and dioptre carefully, then look through the binocular for several minutes. Ensure the full field is visible, and the focus wheel is accessible without altering your grip.
Focus speed, precision and close focus
Focus-wheel speed is usually described by how much you have to turn it to go from close focus to infinity.
However, this figure does not provide a complete picture. Two binoculars can require the same total movement while distributing it differently. One may devote much of its travel to very close distances. Another may provide finer adjustment at normal birding distances.
Fast focusing helps when a bird moves from nearby scrub to a distant tree. It can also make precise adjustment more sensitive.
Slower gearing can provide greater precision but may require too much movement when distance changes quickly.
There’s no single best choice for everyone.
The focus wheel should move smoothly, without looseness, before the focus begins to change. Resistance should prevent accidental changes while still allowing one-finger use.
The dioptre compensates for differences between the observer’s eyes. It should be accurate, repeatable and difficult to disturb accidentally.
Close focus is the shortest distance at which the binocular can focus. It can be useful for insects, flowers and nearby birds.
Bear in mind the published minimum may not be comfortable for everyone. At close distances, the eyes must turn inward more strongly to merge the images.
For general birding, focus behaviour between a few metres and infinity may matter more than achieving the shortest possible figure.
Weight, balance and other equipment
Weight is important, but lighter binoculars don’t always give you a better image.
Lower mass can improve practical usefulness when the binocular is carried farther, raised more often or held for longer.
How heavy the binoculars feel in use isn’t just about their total weight. A slightly heavier model can be more comfortable when the centre of gravity sits close to the hands, and the grip feels secure. A lighter but forward-heavy binocular may place more strain on the wrists.
Birding requires repeatedly raising and lowering binoculars. Briefly holding them in a store does not replicate several hours of field use.
Optical quality is about the image you see. Comfort is about how easy the binoculars are to use. What matters most is whether you carry and use them enough to find and identify birds.
Weatherproofing, durability and repair
“Weatherproof” and “waterproof” are most useful when accompanied by a recognised test standard. Manufacturers may specify immersion depth, duration or pressure; that is more informative than the word waterproof alone. Nitrogen or another dry gas can reduce internal fogging while the binocular remains sealed, but it does not make the seals permanent.
Durability also depends on:
eyecups;
focus and dioptre mechanisms;
hinge tension;
rubber armour;
replacement caps;
strap attachments.
Warranty duration and repairability are distinct considerations. A warranty outlines which faults are covered. Repairability depends on parts availability, service centres, and whether the manufacturer accepts out-of-warranty repairs. These details may change, so verify them in your country before purchase.
What do you actually get when you spend more?
Price alone is not a reliable measure of quality. The largest practical improvement often comes when moving from weak or poorly aligned optics to a competent binocular. A comfortably merged image, accurate focus, effective coatings and useful contrast can make a substantial difference.
After a certain point, the improvements get smaller.
A binocular that costs four times more will not reveal four times the detail. Once central sharpness is sufficient, higher prices typically improve other areas.
Price and quality level: what the buyer should gain; likely remaining compromises.
Basic functional
Merged image, useful central detail and working focus. Greater variation between samples, simpler coatings and less refined mechanics
Competent lower-mid range
Sound alignment, useful coatings, dependable mechanics and often better colour correction. ED does not guarantee glare control, wide field, good edges or ideal fit.
Advanced mid-range
Better contrast, wider usable field, more refined eyepieces and focusing. Some edge, fit or mechanical compromises may remain.
Extreme high-end
Reduction of many small optical and mechanical imperfections, tighter tolerances and stronger service support. High cost, diminishing visible gains and fit that remains individual.
At higher price levels, several parts of the experience may improve together: glare control, field correction, eye placement, focusing, housing quality and repair support.
At the highest price levels, manufacturers are usually refining areas that remain after central sharpness is already strong.
High-end binoculars often stand out by eliminating small annoyances, not by making the centre of the image much sharper.
Frequent birders may consistently appreciate small improvements in eye placement, glare resistance, and focus feel. Occasional birders in good light may find these enhancements less significant.
No matter how much you spend, you can’t guarantee perfect alignment or a custom fit.
Take your present binoculars with you
Most competent binoculars look clear in a bright light. The key question is whether the new binoculars are a real step up from the ones you already have.
Take your present binoculars to the retailer. Compare both from the same position, on the same targets and under the same light.
Before comparing:
Adjust the interpupillary distance.
Set the eyecups correctly.
Focus carefully.
Set the dioptre.
Wear your normal birding spectacles.
A minor setup error can cause a high-quality binocular to seem less sharp or comfortable. Compare outdoors where possible.
Begin with fine central detail such as lettering, bark or brickwork. Ask whether one binocular makes something genuinely easier to distinguish.
Then examine low-contrast detail in shade. Dark foliage or a shaded wall may reveal differences that bright light hides.
Try looking at branches or signs against a bright sky to reveal false colour.
Test glare by viewing a darker target near bright sky or a reflection, without looking at the Sun. Note whether the view retains contrast or develops a pale veil.
Move detail from the centre towards the edge. Notice where it softens and whether refocusing restores part of it.
Follow a moving bird when conditions allow. Notice how quickly it is found, whether it remains easy to follow and whether blackouts appear.
Alternate between nearby and remote targets. Compare focus speed, precision and any delay when reversing direction.
Hold each binocular continuously for several minutes. Raise and lower it repeatedly.
Repeat the test at a different light level where possible.
Don’t choose just because a binocular looks brighter in the shop.
The central question is:
Can I describe a meaningful improvement in the birding I actually do?
That improvement might be:
more identifiable detail;
faster target acquisition;
a wider usable field;
less false colour;
better glare control;
greater confidence in low light;
easier eye placement;
lower fatigue;
smoother mechanics.
It’s worth upgrading when the benefits are clear, consistent, and big enough to make the cost worthwhile.
Which compromises matter least?
Begin your final decision by identifying the limitation that most frequently affects your birding.
A woodland birder may value field width and easy eye placement more than greater magnification.
Someone watching distant waders may accept more visible hand movement in return for a larger image.
A long-distance walker may gain more from lower weight than from better correction at the extreme edge.
A spectacle wearer may place usable eye relief above almost every other refinement.
Ask five final questions:
What problem am I trying to solve?
Does this binocular solve it in the conditions that matter?
Can I see the improvement directly against what I own?
What compromise has become worse?
Will the gain occur often enough to justify the cost?
The right binoculars have optics that are good enough for your needs, fit your face and hands, and are practical enough that you will carry them. The remaining trade-offs should not interfere with the birding you do most often.
See how these trade-offs appear in practice in the Hawke Frontier ED X 8×25 review
Sources and further reading
Technical information checked: 28 August 2026.